DRT HOW 2s / DIVI 5 & WORDPRESS TUTORIALS
BUILD IT · HOW 2 #08
A little movement.
A simple hover.
How to add a simple image hover effect in Divi 5: a gentle zoom, a smooth return and no extra plugin.
→
WHAT YOU’LL BUILD
One image. Two states.
Make an image gently enlarge when someone hovers over it. We’ll use the native Image module and keep the effect subtle.
You need: Divi 5, one image and a draft page. This is a hover zoom, not a two-image rollover swap.
Add one Image module
Start on a draft or staging page. Add a regular section, a one-column row and Divi’s native Image module. Choose an image from your Media Library and give it useful alternative text.
Use a reasonably sharp image at the size it will appear. Leave the module link empty for this decorative example. A zoom effect does not have to open a lightbox or lead somewhere.
Set the normal size first
Open Image → Design → Transform. Choose the Scale control, the first transform icon. In the device/state selector beside the Content, Design and Advanced tabs, choose Desktop. Keep the normal X and Y scale at 100%.
Scale changes the visual size without pushing the surrounding content out of the way. Leave some breathing room around the image so its enlarged edges do not cover a heading, button or neighboring card.
Give Hover a small change
Open that same device/state selector and choose Hover. Set Transform Scale to 105% on both X and Y. Keep the axes linked so the image retains its proportions; confirm both fields read 105 after leaving the field.
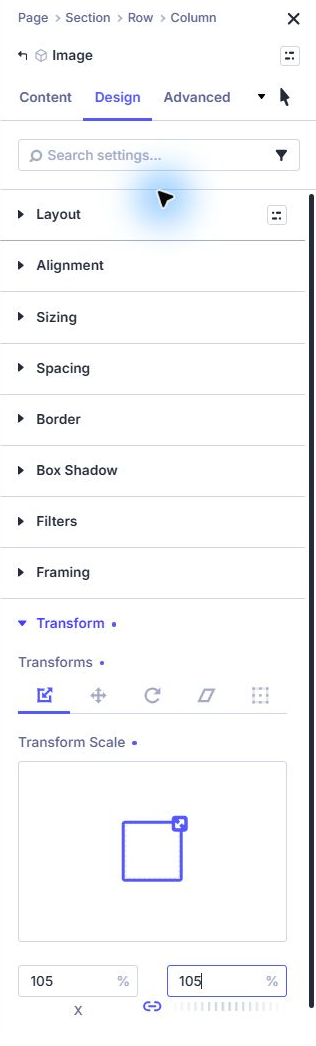
Return to Desktop and confirm the normal values still read 100%. You now have two states of the same image: normal and slightly larger on hover. This tutorial does not swap between two image files.
Keep the transition short
Return to Desktop, then open Advanced → Transitions. Use a 300ms duration, 0ms delay and Ease speed curve. These are the defaults shown on our Testing installation.
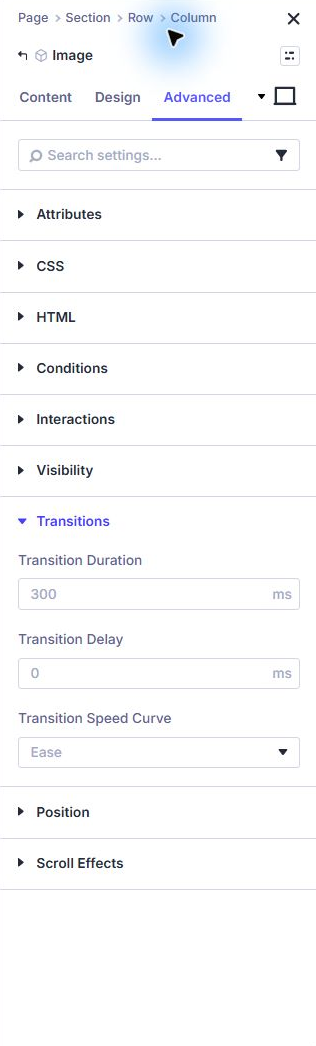
If these controls look disabled, check that you have left the Hover editing state. The transition belongs to the normal setup. Avoid a long delay: the image should respond as soon as the visitor reaches it.
Save and try the real page
Save the page and exit the Visual Builder. Move the pointer onto and away from the image a few times. It should ease in, then return smoothly, without moving the next section.
- Normal scale is 100%; hover scale is 105% on both axes.
- The enlarged image does not overlap other content.
- The image remains clear, with no essential information hidden on hover.
- Check the phone view: touch visitors must be able to understand and use the page without this effect.
- If the image is a link, also test keyboard focus and the destination. Do not remove its visible focus outline.
Here is the same small visual change in a working example. On a touch-only device it stays in its normal state; reduced-motion settings disable its movement.
TRY IT / MOVE YOUR POINTER OVER THE IMAGE

A little closer. Then back again.
This HTML/CSS example demonstrates the result. It is decorative, has no click action, and does not replace your Divi module.
YOU’VE BUILT IT
Small effect. Easy to reuse.
Try the same approach on a project image or a product feature. Keep the surrounding content readable and let the image do just enough.
References & notes
Written for Divi 5. Check the features available in your installed release; labels can change. Editor screenshots show actual controls on our Testing site. Diagrams are explanatory illustrations.
- Elegant Themes: the Image module in Divi 5
- Elegant Themes: Transform options in Divi 5
- Elegant Themes: Responsive Editor
Published November 13, 2026 · By Divi Ready Them