DRT HOW 2s / DIVI 5 & WORDPRESS TUTORIALS
BUILD IT · HOW 2 #05
A long page.
A shorter route.
How to add jump links in Divi 5 so visitors can reach services, pricing or a contact section without searching through the whole page.
Less scrolling.
→
WHAT YOU’LL BUILD
Make a useful page easier to explore.
Build a simple three-link navigation that points to named sections. Then make sure those destinations still work from the rest of your site.
You need: WordPress with Divi 5, permission to edit a page and three destination sections. Start with a draft or a backed-up copy.
Choose three useful destinations
A jump link takes a visitor to a named place on the current page. Start with three sections that someone might want to reach directly: Services, Pricing and Contact.
Give each destination a visible heading and useful content. Put the navigation near the introduction, before someone has to scroll through the whole page. Three clear choices are more helpful than a dense list of every heading.
servicespricingcontact#services#pricing#contact#. The spelling must match exactly.Give each Divi section a unique ID
Open the destination Section’s settings and go to Advanced → Attributes. Use Add Attribute, choose id and enter services as its Attribute Value. Close the attribute editor and repeat for Pricing and Contact.
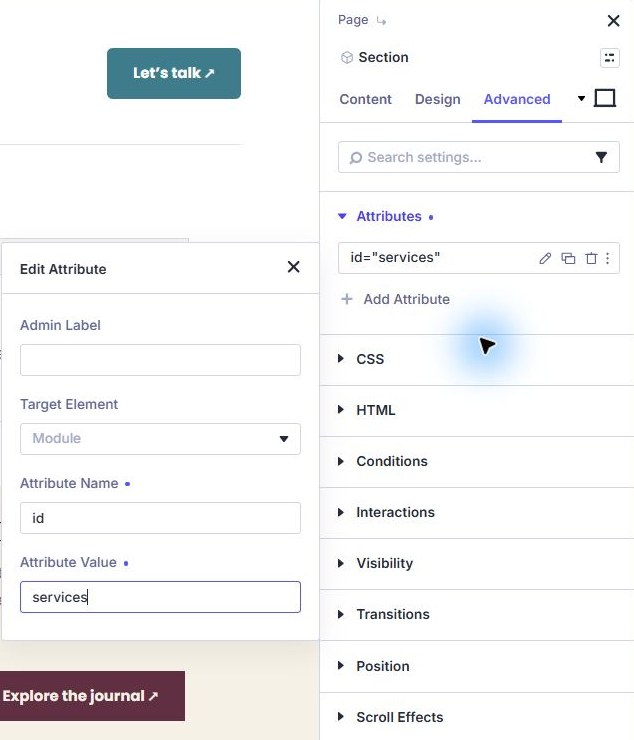
Use short lowercase names with hyphens when needed, such as our-work. Avoid spaces, punctuation and changing capitalization. A page must not contain two elements with the same ID. After duplicating a section, check its attributes before keeping both copies.
Place the ID on the section containing the destination heading, rather than on an unrelated element farther down the content. That gives the jump a sensible landing point.
Create the links people will click
For a few links, add a Text module near the top of the page. Write Services, Pricing and Contact. Select Services, use the text editor’s link control and enter #services. Repeat with #pricing and #contact. Keep them in the same tab.
A Button module works too: give it descriptive text such as “See pricing” and use #pricing as its URL. Do not make every button say “Learn more.” Visitors should know where each choice leads.
Keep the text readable and allow space between links. On a narrow screen, let the group wrap onto another line. Use a visible focus style so keyboard users can find the selected link.
Prefer an HTML example? Put this small navigation in a Divi Code module and give the destination sections the corresponding IDs:
<nav aria-label="Explore this page">
  <a href="#services">Services</a>
  <a href="#pricing">Pricing</a>
  <a href="#contact">Contact</a>
</nav>
Use full page links in a shared header
#contact means the Contact destination on whichever page the visitor is currently viewing. That is right for a page’s own jump navigation. It can be wrong in a global header that also appears on pages without that section.
For a link from another page, include the destination page path before the fragment: /services/#contact points to the Contact section on a Services page. Use the actual path for your own website. If the destination is your homepage, /#contact points there.
If you use a WordPress navigation menu, add these as Custom Links, then save that menu. If your Divi global header contains a Menu module, confirm it is displaying the menu you edited. A local three-link Text module does not require changing the site-wide navigation.
Leave room for a sticky header
Save and open the real page. Select Pricing and check that its heading is visible when the jump finishes. A fixed header can cover the top of the target, even though the URL and the ID match.
If your setup needs extra clearance, this optional CSS adds scroll margin only to the three named targets. Add it in the page’s custom CSS area or a small Code module. Adjust 110px to the height and spacing of your actual header.
<style>
#services, #prici